Coral: mysql intro
|
MySQL - Introduction MySQL is an open source database server. When used in conjunction with PHP scripts, powerful and dynamic server-side applications can be created. MySQL server administration is performed using phpMyAdmin and The Uniform Server’s integrated utilities. This page covers the configuration sub-menu. |
| ||||||||||||||||||||||||||
Change Password
|
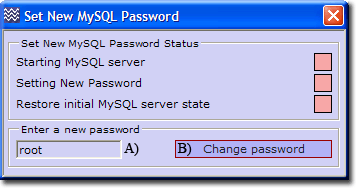
Change or set a new MySQL root user password.
|
The change process is automatic; the indicators show the actions taken.
Note: For detailed information, see MySQL - Change password
Restore Password
|
Restore MySQL root user password
The restore process is automatic; the indicators show the actions taken. |
Edit my.ini
Server Configuration > MySQL > Edit my.ini
Opens the configuration file in notepad, allowing you to directly edit the file, which is UniServer\usr\local\mysql\my.ini
View Error log file mysql.err
Server Configuration > MySQL > View Error log file mysql.err
This menu option provides a convenient short cut, allowing you to view the MySQL server log file. If you are experiencing problems with the server, this should be your first port of call; its content may shed light on a particular issue.
The path to the log file is: UniServer\usr\local\mysql\data\mysql.err
Note: Depending on where you extracted UniServer, the path may differ.
A short extract from the file:
110706 11:40:41 [Note] Plugin 'FEDERATED' is disabled.
110706 11:40:41 [Note] Plugin 'InnoDB' is disabled.
110706 11:40:43 [Note] Event Scheduler: Loaded 0 events
110706 11:40:43 [Note] C:\UniServer\usr\local\mysql\bin\mysqld1.exe: ready for connections.
Version: '5.5.14'  socket: ''  port: 3306  MySQL Community Server (GPL)
110706 11:55:35 [Note] C:\UniServer\usr\local\mysql\bin\mysqld1.exe: Normal shutdown
110706 11:55:35 [Note] Event Scheduler: Purging the queue. 0 events
110706 11:55:36 [Note] C:\UniServer\usr\local\mysql\bin\mysqld1.exe: Shutdown complete
Create Delete Database
There are three methods for creating or deleting a database: via command prompt, phpMyAdmin or UniController. UniController provides a convenient menu option described bellow. To use this option, the MySQL server must be running, otherwise a warning message is produced.
Server Configuration > MySQL > Create Delete Database
|
Create Database
Delete Database
Note 1: Clear both (4) deletes the entered name and database selected. Note 2: For detailed information, see MySQL Create Delete Database |
Create Restricted MySQL User
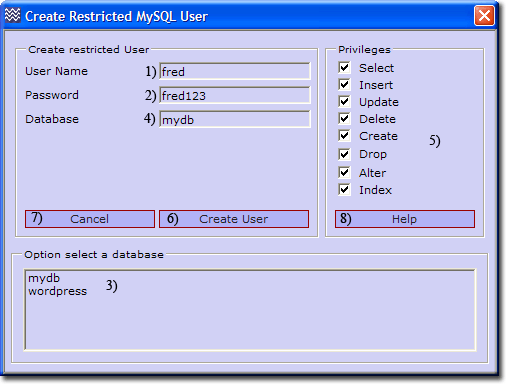
A restricted user has no root privileges and is constrained to a single database.
There are three methods for creating a restricted user: at a command prompt, with phpMyAdmin or through UniController, which provides a convenient menu option described below. To use this option, the MySQL server must be running, otherwise a warning message will show.
Server Configuration > MySQL > Create Restricted MySQL User
Note 2: For detailed information, see MySQL Create Restricted User |
Edit Restricted MySQL User
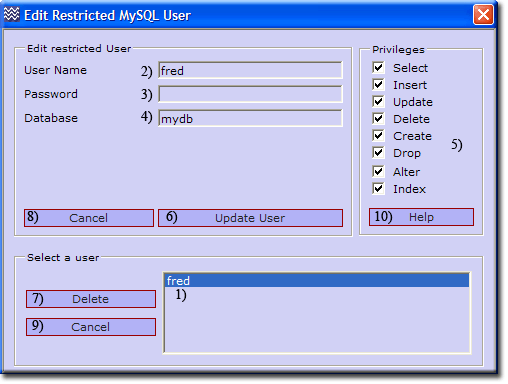
The same aspects for creating a restricted user (above) apply to editing restricted users. The UniController menu is decribed below.
Server Configuration > MySQL > Edit Restricted MySQL User
|
Edit Restricted User
Delete Restricted User
|
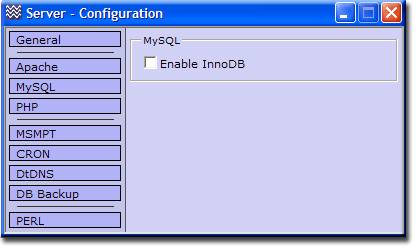
InnoDB Enable Disable
|
Uniform Server default is InnoDB disabled. The following sub-menu allows you to enable or disable InnoDB:
Note: After changing the state, you must restart the MySQL server to read the configuration. |
Files modified: UniServer\usr\local\mysql\my.ini, UniServer\usr\local\mysql\small_my.ini and UniServer\usr\local\mysql\medium_my.ini
Top General note: MySQL access and privileges
When connecting to a MySQL server, the host from which the connection is made, a user name and user password specified all determine that user's identity. This identity informs MySQL what access is allowed to the server and what privileges are assigned to this user.
C:\UniServer\usr\local\mysql\bin>mysql -uroot -proot mysql> SELECT User, Host, Password FROM mysql.user; +------+-----------+-------------------------------------------+ | User | Host | Password | +------+-----------+-------------------------------------------+ | root | localhost | *81F5E21E35407D884A6CD4A731AEBFB6AF209E1B | | root | 127.0.0.1 | *81F5E21E35407D884A6CD4A731AEBFB6AF209E1B | | root | ::1 | *81F5E21E35407D884A6CD4A731AEBFB6AF209E1B | | pma | localhost | *81F5E21E35407D884A6CD4A731AEBFB6AF209E1B | +------+-----------+-------------------------------------------+ mysql>exit Bye |
There are three, root accounts that permit connections from the local host only. Connections can be made by specifying the host name localhost, the IP address 127.0.0.1, or the IPv6 address ::1.
|


