Coral: start server utilities
|
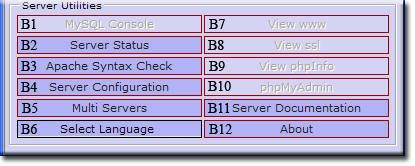
Server Utilities Both UniController menus (started by run as program or run as a service) have a menu section titled Server Utilities which provides useful features, such as single button access to PHPMyAdmin and server configuration. |
| ||||||||||||||||||||||||||
B1 - MySQL Console
The MySQL console button opens a command window and changes the working directory to the MySQL binary folder. From here you can login to the MySQL server and open a MySQL prompt.
Logging into the server requires a user name and password. The defaults are root and root (root user account). At the first opportunity you should have changed this password! If you have forgotten the root user password, it is retrievable in one of two ways.
- Open file UniServer\coral_con\config_tracker.ini and look for section [MYSQL] line password = .
- Or from UniController: Server Configuration (B4) > MySQL > Change Password - The password is displayed in the bottom left. Do not make any changes; just close the window.
Login to MySQL console
- At the command prompt, enter: mysql –uroot –proot
- Quit MySQL monitor by typing: exit
For more details, see MySQL Console
B2 - Server Status
Clicking the Server Status menu button opens a pop-up that displays a list of current server parameters.
|
General Status
Apache Server & MySQL Server
Port Status
|
B3 - Apache Syntax Check
The Apache Syntax Check button initiates a syntax check on Apache's configuration files. The results are displayed in a pop-up message box. Any errors found require correction before the Apache server will start. The check is equivalent to the following manual procedure:
- Start > All Programs > Accessories > Command Prompt - Opens a command window
- In the command window type: cd C:\UniServer\usr\local\apache2\bin
- In the command window type: httpd1.exe -t
Note 1: The path to the Apache binary in step 2 may be different depending on where you installed The Uniform Server
Note 2: If you previously ran multi-servers, the Apache binary httpd1.exe in step 3 will have a different digit.
B4 - Server Configuration
|
Clicking the Server Configuration button opens a pop-up displaying the server configuration menu.
Note: Configuration menu headings are reflected in documentation top left menu. Documentation menu also opens sub-menu items corresponding to configuration items. |
B5 - Multi Servers
|
Multi-servers enables you to run more than one copy of The Uniform Server (Apache and MySQL) on the same PC. To achieve this, the executables and services are renamed and the ports the servers run on are changed.
|
B6 - Select Language
This drop down menu displays the currently supported languages.
Language files are contained in folder UniServer\uni_con\lang. This folder is scanned for all language files (with the exception of the active language file, lang.vbs). The names are then listed in the dropdown menu. Selecting a language overwrites the lang.vbs file with the appropriate language.
A language file name has a corresponding folder name in the documentation folder UniServer\docs. Any references to document pages are automatically switched to the appropriate language folder.
Note: You are welcome to submit a language file for inclusion in the next release. Use file UniServer\uni_con\lang\English.vbs as a template.
B7 - View www
This is a user definable button. The default action is to open an html page in the default browser, which then redirects to an index page served by Apache.
- UniServer\tmp\redirect.html - Location and name of redirect file dynamically updated.
- url=http://localhost:80/index.php" - Redirected to this page on server
B8 - View ssl
This is a user definable button. The default action is to open an html page in the default browser, which then redirects to an index page served by Apache.
- UniServer\tmp\redirect.html - Location and name of redirect file dynamically updated.
- url=https://localhost:443/index.php" - Redirected to this page on server
B9 - View phpInfo
This menu button opens an html page in the default browser, which redirects to a page served by Apache. This in turn runs the PHP function phpinfo() displaying a wealth of information relating to PHP. The page provides very detailed information, and a menu splits this into smaller sections, making it easier to read.
- UniServer\tmp\redirect.html - Location and name of redirect file dynamically updated.
- url=http://localhost:80/us_extra/phpinfo.php" - Redirected to this page on server
PHP Info Menu
- Configuration - Displays PHP Core configuration.
- Enviroment - PHP current environment
- Modules - List all modules
- Extensions - Overview and details (includes functions) for all loaded extensions.
- Variables - List all currently available PHP variables.
- General - Intro information
B10 - phpMyAdmin
phpMyAdmin is a MySQL admininstration tool written in PHP. It allows you to perform tasks such as creating, modifying or deleting databases. You can execute SQL statements and manage users and their permissions.
The phpMyAdmin menu button opens an html page in the default browser, which redirects to the phpMyAdmin index page served by Apache.
- UniServer\tmp\redirect.html - Location and name of the dynamically updated redirect file.
- url=http://localhost:80/us_phpmyadmin/index.php" - Target of redirection on the server
phpMyAdmin Access
By default phpMyAdmin is accessible only to localhost. To allow access for external users (Intranet and Internet), refer to the phpMyAdmin Access page for details.
B11 - Server Documentation
The Server Documentation button opens the index.html page from which the pages you are reading can be accessed. It follows the structure of the UniController menu. The top level describes commonly used functionality while sub-menus detail the next level of functionality and provide more detailed information. It is self-contained, requiring no external references. This notwithstanding, there is quite a bit of additional information available at The Uniform Server's Wiki site wiki.uniformserver.com
B12 - About
About provides an overview of "UniController", in particular why it was implemented in VbScript and HTAs. In addition to providing support for different languages, a user can easily tailor and modify the menu structure to meet their differing requirements.
