Coral: apache vhosts
|
Apache Vhosts The Uniform Server is configured for name-based virtual hosting. This allows you to run any number of web sites from a single IP address. Each domain-name you host must first be registered and an “A” record created on a DNS server. This “A” record translates the domain-name to your IP address.
|
| ||||||||||||||||||||||||||
Features
The main features of The Uniform Server’s Vhost configuration menu are:
- Include separate log files and server alias
- Auto enable when first vhost created
- Auto disable when last vhost deleted
- Port tracking follows main server port (defaults to port 80)
- Writes host name to Windows hosts file when vhost created
- Deletes host name from Windows hosts file when vhost deleted
Overview
Vhosts are configured using a separate configuration file UniServer\usr\local\apache2\conf\extra\httpd-vhosts.conf.
This file requires enabling in Apache’s main configuration file UniServer\usr\local\apache2\conf\httpd.conf
|
Search this file for the following line:< br /> #Include conf/extra/httpd-vhosts.conf |
Remove the hash "#" to enable as shown below:< br /> Include conf/extra/httpd-vhosts.conf |
Note: The above is automatically performed when using The Uniform Server’s Vhost configuration menu.
Inform Apache to use Vhosts
Apache requires the directive NameVirtualHost address:port which instructs it to use virtual hosts and resolve an address on the specified port. The Uniform Server uses *:80, where the * is a wildcard meaning use all addresses. Port 80 is the standard web server listening port. This can be changed if required, for example, to port 8080.
A separate NameVirtualHost directive is required for each different port used. These NameVirtualHost directives must have a corresponding listening directive. The Uniform Server’s Vhost configuration file contains the following block:
#--US_START--------------Do not remove NameVirtualHost *:80 #--US_END----------------Do not remove |
The "Do not remove" Lines are used by The Uniform Server to locate the block and insert lines as appropriate. |
However, adding a virtual host that uses port 8080, a listen directive is required. The configuration block becomes:
#--US_START--------------Do not remove Listen 8080 NameVirtualHost *:80 NameVirtualHost *:8080 #--US_END----------------Do not remove |
The main configuration file (httpd.conf) does not contain a Listen 8080 directive and it is required and added to this configuration block along with the NameVirtualHost directive.
|
Adding a Vhost
Each virtual host requires a separate configuration block. These blocks inherit their configuration from the main configuration file httpd.conf. Specifying an Apache directive in a Vhost block overrides that of the main configuration file. The advantage of this inheritance is to reduce number of Apache directives required for each Vhost. The absolute minimum required is to specify a DocumentRoot and ServerName.
Apache resolves a Vhost by matching its port and ServerName. On finding a match, the server's content is fetched from the folder specified by DocumentRoot. If it cannot find a match, it uses the first Vhost defined (the default). Note: to avoid conflicts, Apache uses a _default_ directive for the address of this first virtual host.
Example: to add a virtual host for fred.com on port 8080 and to serve content from folder UniServer\vhosts\fred, the minimum configuration required is:
#--US_START--------------Do not remove Listen 8080 NameVirtualHost *:80 NameVirtualHost *:8080 #--US_END----------------Do not remove <VirtualHost _default_:80> DocumentRoot C:/Coral/UniServer/www ServerName localhost </VirtualHost> <VirtualHost *:8080> DocumentRoot C:/Coral/UniServer/vhosts/fred ServerName fred.com </VirtualHost> |
The default Vhost maps to The Uniform Server’s folder www. If you wish, this can be changed as well as the server name.
|
Vhost additional Apache directives
Other Apache directives can be included in a Vhost block. Common directives are shown in this example block:
<VirtualHost *:80> ServerAdmin webmaster@fred.net DocumentRoot C:/Coral/UniServer/vhosts/fred_net ServerName fred.net ServerAlias www.fred.net *.fred.net ErrorLog logs/fred.net-error.log CustomLog logs/fred.net-access.log common </VirtualHost> |
ServerAlias Allows you to access the server using sub-domains. Each sub-domain must have a corresponding DNS entry.
|
Apache Vhosts
This menu allows you to quickly create virtual host blocks.
UniController: Server Configuration > Apache > Apache Vhosts
|
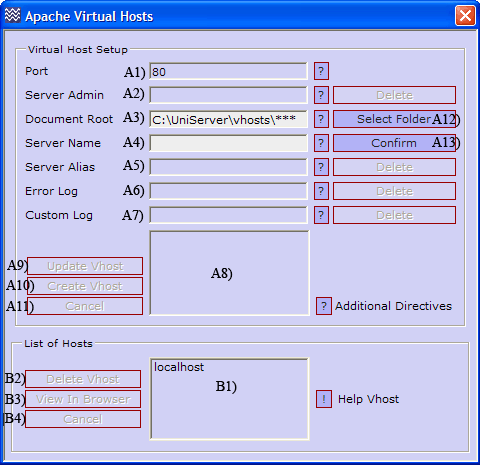
Creating a Vhost requires only two form entries, a server root folder and a host name. After entering these, click the confirm button. All other directives are optional, and are automatically filled in with values based on the above two form entries. Clicking the Create Vhost button creates the root folder if it does not exist. A Vhost is created in the Vhost configuration file and an entry is written to your PC’s host file. Here is a summary of the steps:
Note 1: After creating a Vhost you must restart your Apache server otherwise Apache will not recognise the new configuration. Note 2: For detailed information see Apache Vhosts |
Vhost Configuration Menu Example
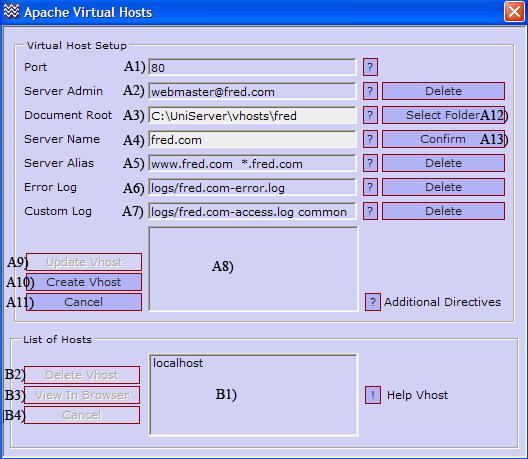
For clarity following example shows Vhost form filled in and the corresponding Vhost block created in the configuration file for host name fred.com and server root folder fred.
|
The block created in httpd-vhosts.conf <VirtualHost *:80> ServerAdmin webmaster@fred.com DocumentRoot C:/UniServer/vhosts/fred ServerName fred.com ServerAlias www.fred.com *.fred.com ErrorLog logs/fred.com-error.log CustomLog logs/fred.com-access.log common </VirtualHost> The entry created in host file 127.0.0.1 fred.com Note: An entry will be created in the List of Hosts (B1). After restarting Apache and returning to this menu you can click an entry. Clicking an entry enables the greyed out buttons, allowing you to perform the following tasks:
|

