MongoDB Tutorial 3: Main Application
|
MongoDB Tutorial 3 : Introduction | Port and Password | Create database | Drop database | Delete User | Main Application | Mongo-Start
|
|
| MongoDB Production Standalone UniServer 6-Carbo. |
Main Application
Introduction
We currently have a number of utilities that require integrating into our main application.
One solution is to add additional buttons; one per utility. Disadvantage of this approach it breaks the otherwise simplistic interface. In the future we may want to add other utilities this would require another user interface change. Clearly this inflexibility is not an ideal solution.
Preferred solution is to retain simple user interface and add drop down menus to main application. These are easy to implement and very flexible. This page covers adding dropdown menus to run our utilities.
Cosmetics
|
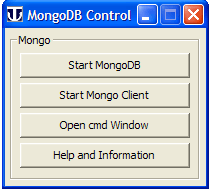
Our main application is shown on right It consists of four buttons these will be rearranged grouping them into two sections. To accommodate drop down menus width needs to increase. |
Drop-down Menu
To create a drop-down menu lefts define menu title and items we require
| File | Configuration | Databases | Users | Help |
| Exit | Change Port | Create Database | Add User | Information |
| Change Admin Password | Drop Database | Delete User | About |
Menu Items
Menu items when clicked create an event this is passed to the handler function for processing.
Like any other button requires a unique ID this is detected using a case statement and appropriate code run.
Define constants
Edit file z_mongo\mongodb_1\control\mongo_db.php add the following constants:
//=File

//=Configuration
define('ID_CHANGE_PORT',       1210);
define('ID_CHANGE_ADMIN_PASS', 1220);

//=Databases
define('ID_CREATE_DATABASE',   1310);
define('ID_DROP_DATABASE',     1320);

//=Users
define('ID_ADD_USER',          1410);
define('ID_DELETE_USER',       1420);

//=Help
define('ID_M_HELP',           1510);
define('ID_M_ABOUT',          1520);
At start of component section add the following:
//=== Create main menu
$mainmenu = wb_create_control($win_mongo, Menu, array(
   "File",
       array(IDCLOSE,                 "Exit"),

   "Configuration",
       array(ID_CHANGE_PORT,        "Change Port"),
       null,                        // separator
       array(ID_CHANGE_ADMIN_PASS,  "Change Admin Password"),


   "Databases",
       array(ID_CREATE_DATABASE,    "Create Database"),
       array(ID_DROP_DATABASE,      "Drop Database"),

   "Users",

       array(ID_ADD_USER,      "Add User"),
       array(ID_DELETE_USER,   "Delete User"),

   "Help",
       array(ID_M_HELP,        "Help "),
       array(ID_M_ABOUT,       "About...")

));
|
Note: A menu item of null inserts a separator |
Utilities to run
With menu defined all that is required is to add case statements to the handler function.
We want to run the following functions:
 delete_user_window($window);
 drop_database_window($window);
 create_database_window($window);
 create_port_change_window($window);
Handler code
Add the following to the handler code
 //=== Process menu items ====================

  //=Configuration
  case ID_CHANGE_PORT:                // Change server port
  case ID_CHANGE_ADMIN_PASS:          // Change Admin password
    create_port_change_window($window);
  break;

  //=Databases
  case ID_CREATE_DATABASE:             // Create database
    create_database_window($window);
  break;

  case ID_DROP_DATABASE:              // Delete database
    drop_database_window($window);
  break;

  //=Users

  case ID_ADD_USER:                   // Add user
    create_database_window($window);
  break;

  case ID_DELETE_USER:                // Delete user
   delete_user_window($window);
  break;

  //=Help
  case ID_M_HELP:                     // Display help info
    wb_exec('Notepad',INFO_TXT);
  break;

  case ID_M_ABOUT:                    // Display About
   $str  = "";
   $str .= "Windows interface by Uniform Server\n";
   $str .= "mongo_pro_standalone_v1_0\n\n";

   $str .= "Core component MongoDB server \n";
   $str .= "Winbinder stub – from phpack v0.7.5\n";
   $str .= "Uniform Server utilities\n";

   wb_message_box($window, $str,"About", WBC_INFO);
  break;


  //=== END Process menu items ====================
Summary
|
That concludes this tutorial finished application shown on right. Although fully functional consider it a starting point where you can add extra functionality as required. To download this application; check the download page for details. See user support page for additional information. |
Components in this application are reusable final application is to produce a Uniform Server plugin version covered in the next tutorial.

