PHP WinBinder: Project2
|
|
| UniServer 5-Nano PHP WinBinder. |
Windows Project 2
The Bat2Exe Converter from Fatih Kodak is a very solid utility that offers more than its name implies. One neat feature is its ability to compress and add extra files to the .exe created.
This combined with WinBinder’s flexibility allows you to produce a Windows application coded in PHP without the need for compiling. An entire windows project can be distributed and run as a single (exe) file.
Project configuration
For quickness I will use example 4 as a template for the new application.
In order to package files into a single .exe requires the file structure be flat. In this respect, WinBinder places no restrictions. Just copy the files to a single folder and change paths accordingly. This step-by-step guides explains how.
I have assumed you installed the plugin to Uniform Server's plugin folder.
|
Change paths
Paths need to be changed for the new flat structure:
| File | Old Path | New Path | ||
| test_4.phpw | Include "../php/include/winbinder.php"; |
Include "winbinder.php"; | ||
| test_4.bat | ..\php\php.exe -c ..\php\php-wb.ini test_4.phpw |
php.exe -c php-wb.ini test_4.phpw | ||
| php-wb.ini | extension_dir = "./extensions" |
extension_dir = "./" |
top | Top]]
Test
Check that the configuration works by running test_4.bat
You now have a working project template. Use this to develop your application.
New batch file
After completing your application create a new batch file named test_5.bat (or any name you like) with the following content:
php.exe -c php-wb.ini test_4.phpw
When run, it will automatically close the command window after application is closed.
Create a single EXE file
The following step-by-step guide explains how to package all required files into a single executable.
|
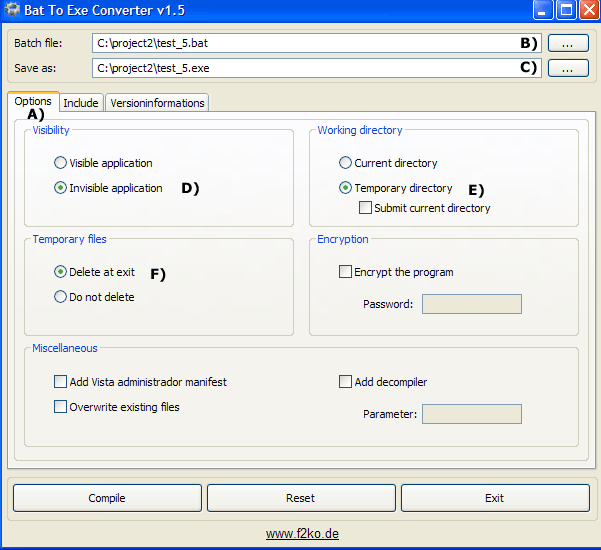
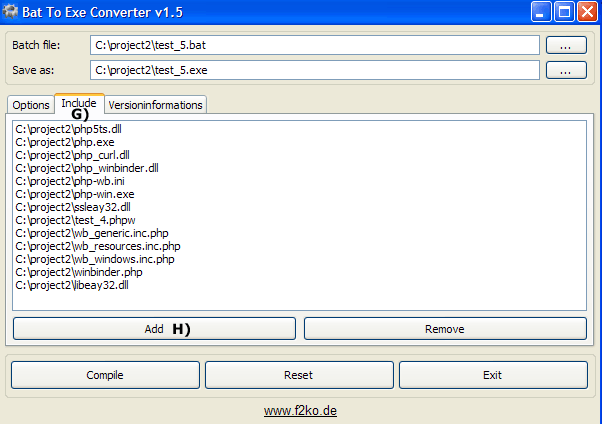
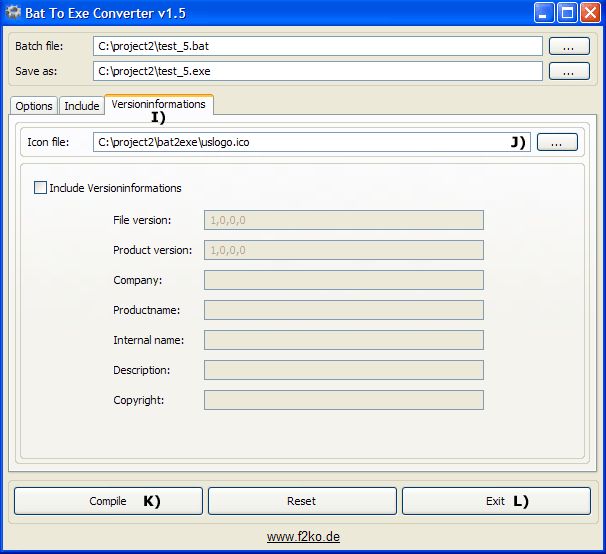
How to create a single EXE file Navigate to folder C:\project2\bat2exe and double click on file Bat_To_Exe_Converter.exe
That completes the first page set-up |
|
|
|
|
Note: Steps I) and J) are optional and only required if using an icon for the .exe file.
Navigate to folder C:\project2 and double click on the file created test_5.exe You can now distribute this single file or use as if it was a compiled. Note: It appears to initially run slower this is because all additional files are decompressed and extracted to a temporary folder before the application is run. Note 1: If you like filling in forms you can add version details. Note 2: Project folder size is 7.58 MB and executable compresses to 2.59 MB. This is reasonable for an un-compiled windows application. |
Summary
I have shown how to use this plugin independently of Uniform Server. It allows you to create Windows applications that are coded in PHP without the need for any compiling.
With this plugin installed to UniServer’s plugins folder it allows you to tap into 5-Nano’s control core. The advantage of this is that you can create a Windows application to provide an alternative control interface.
More importantly you can tailor an application to meet your specific requirements.
UniController from UniServer 4-Mona series remains a popular control interface and makes an ideal vehicle for explaining programming techniques involved in producing an alternative controller.
The remaining part of this tutorial covers UniController for the 5-Nano series. See next page for an introduction.


