Installing WordPress on 4.0-Mona
| Installing WordPress on 4.0-Mona |
Introduction
The following instructions show you how to install WordPress on a clean version of 4.0-Mona.
WordPress is easy to install on Uniform Server 4.0-Mona, do you need a portable version, no problem. New to blogging and want to get a feel for it in your own time and not be embarrassed by making mistakes on-line. Then this page is probably what you are looking for.
It shows you how to install WordPress on UniServer allowing you to explore WordPress’s features, test plugins and widgets.
Pre-Installation 1
|
Install Uniform server
Download WordPress
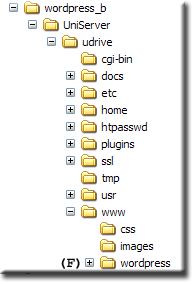
Copy files to Uniform Server
|
Pre-Installation 2
|
Create a WordPress configuration file.
|
Installation - Create a WordPress Database
Creating the WordPress database is straight forward, tables are automatically inserted during installation
|
Installation
To start the WordPress installation process type http://localhost/wordpress/wp-admin/install.php into your browser and follow the instructions.
There are two pages to the process as follows:
1) Welcome page requires the following information:
- Blog title: UniCenter Test -- (Choose whatever you like you can change this in WordPress)
- Your e-mail: test@unicenter_test.com -- (Any email will do you can change this in WordPress)
- Un-Check, "Allow my blog to appear in search engines ..." -- (Not required for testing)
- Click on Install WordPress
2) Success page (I liked the final comment)
Note: username "admin" and password "a1f096". (the password is random make this the first thing you change in WordPress)
Change your WordPress Password
Login to WordPress either using the link on the Success page or type type the following into your browser http://localhost/wordpress/wp-login.php
Use the username "admin" and password "see step 2 above"
Click on Users (top menu bar) select click on Your Profile, scroll down the page to Update Your Password and enter your new password twice. Click Update Profile (bottom right)
Note: The above is not necessary however it is niece to have a password you can remember!
Accessing WordPress Information
| Login to WordPress by typing the following into your browser: | http://localhost/wordpress/wp-login.php |
| To view your Blog type the following into your browser: | http://localhost/wordpress/ |
Permalinks
There are three types of WordPress permalinks (permanent links):
- Default “Ugly” e.g. http://example.com/?page=Number
- Pretty Permalinks "uses mod_rewrite" e.g. http://example.com/year/month/day/post-name
- PATHINFO "include index.php" e.g http://example.com/index.php/yyyy/mm/dd/post-name/
The following example shows how to enable custom permalinks (Pretty Permalinks).
- Log into Wordpress select Dashboard > Settings > Permalinks
- Click Custom radio button and enter /%postname%/%post_id%/
For a full list of variables check the WordPress Wiki - Click Save Changes
Permalinks - Error message
When you view your WordPress site the following error message is displayed:
Forbidden
You don't have permission to access /wordpress/ on this server.
To resolve this issue enable mod_rewrite in Apache’s configuration file and allow WordPress to following symbolic links these are covered below:
.htaccess
After clicking "Save Changes" Wordpress creates a new file in folder UniServer\udrive\www\wordpress named .htaccess
Open this file in a text editor it will look similar to this:
# BEGIN WordPress
<IfModule mod_rewrite.c>
RewriteEngine On
RewriteBase /wordpress/
RewriteCond %{REQUEST_FILENAME} !-f
RewriteCond %{REQUEST_FILENAME} !-d
RewriteRule . /wordpress/index.php [L]
</IfModule>
# END WordPress
Add the following line: Options +FollowSymLinks so the file looks like this:
Options +FollowSymLinks
# BEGIN WordPress
<IfModule mod_rewrite.c>
RewriteEngine On
RewriteBase /wordpress/
RewriteCond %{REQUEST_FILENAME} !-f
RewriteCond %{REQUEST_FILENAME} !-d
RewriteRule . /wordpress/index.php [L]
</IfModule>
# END WordPress
Note: If you change the custom variables all content between # BEGIN WordPress and # END WordPress markers are overwritten hence the reason for putting the line Options +FollowSymLinks outside of the WordPress block.
httpd.conf
Edit Apache's configuration file:
UniServer\udrive\usr\local\apache2\conf\httpd.conf
Locate this line (194):
#LoadModule rewrite_module modules/mod_rewrite.so
Remove the hash "#" as shown:
LoadModule rewrite_module modules/mod_rewrite.so
Save the file and restart servers check the new link format works.
Portability
If you want a portable version of WordPress copy the folder UniServer and all its content to your USB memory stick that’s it. Don’t expect fantastic speeds however it is usable.
Conclusion
WordPress is extremely easy to install on UniServer, if you want to have a go at blogging give it a spin on your own PC. Need more information pop over to WordPress.org when you feel confident get a free blog on WordPress.com.


