FileZilla Server3: Implicit SSL part 1
|
FileZilla Server3: Introduction | Basic Config 1 | Basic Config 2 | Implicit SSL part 1 | Implicit SSL part 2 | Portable FileZilla FTPd | Install Options | Batch Files | UniTray
|
| Uniform Server 5-Nano FileZilla FTPd (Server). |
Implicit SSL
The previous pages descried how to install the FileZilla server on uniform server. Passwords and data are sent unencrypted over the Internet. Depending on your application and use this is adequate and suitable for most purposes.
FileZila FTPd overs a much more secure alternative using SSL to encrypt both passwords and data. There are a number of steps required in setting up a secure FTP server hence is relatively difficult. I have split this over two pages making it clearer and hopefully easier to understand.
The procedure is incremental first create a server certificate ensure it runs on a local network and finally configure for Internet access.
Server certificate
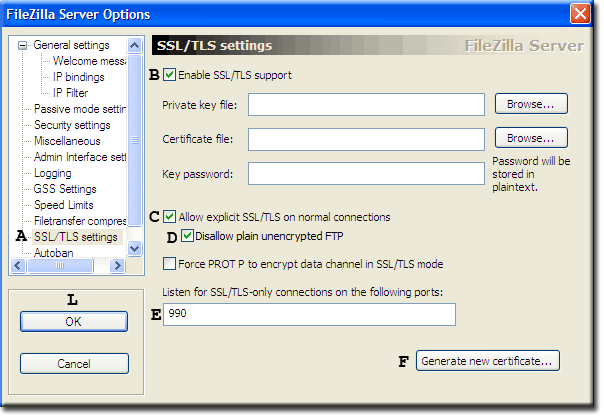
FileZilla has a built in certificate generator making this process very easy.
Enable SSL support
Note:
|
|
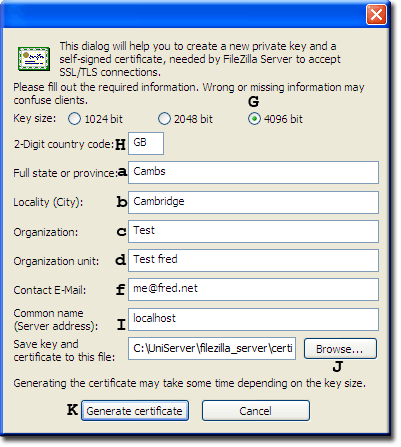
Fill in certificate detailsClicking Generate new certificate opens the certificate form fill in as follows: <ol start="10"> <li> Seclect Key size 4096bit - G) - may need to reduce this to 1024</li> <li> Insert 2-Digit country code - H)</li> <li> Fill in some real or dummy information a) to f)</li> <li> Fill in Common name Use localhost or your real domain name - I)</li> <li> Click browse button - J)<br> Navigate to folder C:\UniServer\filezilla_server<br>This is where the certificate will be saved.<br><br> Note 1: Your virtual drive letter may be different hence use that.<br>Note 2: If you are not using portable mode choose any folder you like.<br>However its a good idea to use folder<br>*\filezilla_server\filezilla_server_portable<br><br> </li> <li> Click Generate certificate this will take a while. - K) </li> <li> When complete click OK - L) </ol> |
|
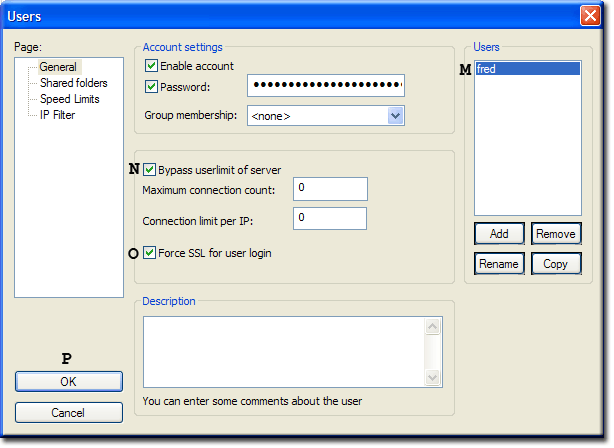
Enable user to use SSL<ol start="17"> <li> From FileZilla admin select Edit > Users</li> <li> Select page General - left menu</li> <li> Select a user account - M)</li> <li> Check Bypass - N)</li> <li> Check Force SSL for user login - O)</li> <li> Click OK - P)</li> <li> Restart server</li> </ol> That completes the FileZille set-up. Note: Although we are using a single user account the above can be applied to other users. You can have a mix of users some using encryption while other do not the choice is yours. |
Client - FireFTP
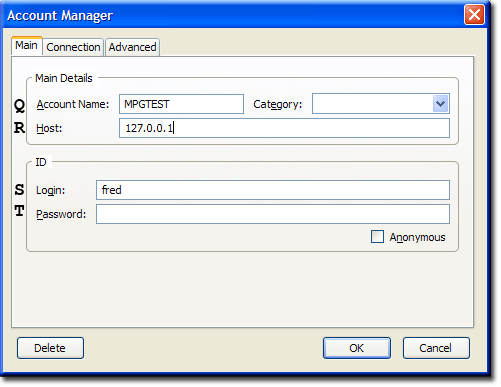
FireFox and FireFTPI am assuming your are using FireFox and FireFTP these two are a great combination. You can use your preferred client the set-up will be similar. Check your clients manual for instructions.
Main Tab
|
|
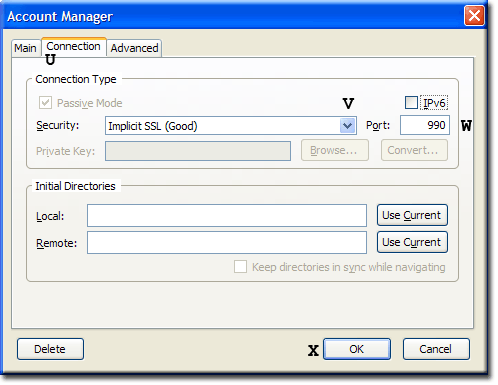
Connection Tab<ol start="6"> <li> Click on Connection tab - U)</li> <li> From the drop down menu select Implicit SSL (Good) - V)</li> <li> Check the port number 990 is set - W)</li> <li> Finally click OK - X)</li> </ol> Note: You may need to check the IPv6 box for 4096bi! Local testFrom FireFTP click the Connect button enter name and password. Your browser will have a whinge, create a certificate exception. FTP folder will display. Local network testOn another PC connected to your network repeat the above steps 1-9. Note: At step 1 enter your PC’s IP address. (See Basic Configuration 1 page how to obtain IP address) That confirms you can access the FTP server across your network. |
Client - FieZilla
For completeness I have included this section it shows how to install portable FileZilla client and how to use it for testing the above.
Install
- Create a new folder C:\FileZilla_client (can be any name)
- Download the latest client FileZillaPortable_3.3.0.1.paf.exe from PortableAppas
- Save to the above folder
- Double click on FileZillaPortable_3.3.0.1.paf.exe to extract
- Select language English click OK
- Click Next
- Choose Components defaults are OK click Next
- Click Browse navigate to folder C:\FileZilla_client
- Click Install
- Click Finish
Run Client
- Navigate to folder C:\FileZilla_client\FileZillaPortable
- To run double click on file FileZillaPortable.exe
Local test
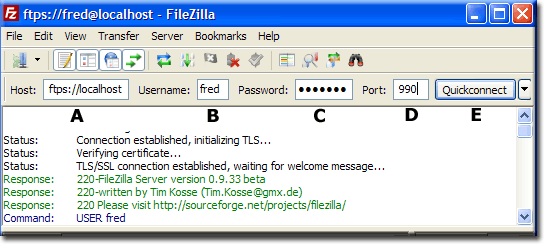
Using quick connect makes testing extremely easy fill in the top row as follows:
You can now view and navigate folders assigned to user fred |
Summary
The above provides a secure link to your FTP server. If you are running a wireless network, data can be intercepted by sniffing the radio signals.
Should your basic wireless security be compromised the FTP encryption will provide another hurdle making it more difficult for that data to be accessed.
You do need the above security when FTPing data across the Internet. Before proceeding to the final part make sure you can securely FTP locally.
