FileZilla Server3: Basic Configuration 1: Difference between revisions
New page: {{Uc nav FileZilla Server3}} '''FileZilla Server basic set-up''' This page covers basic server configuration it assumes you have extracted and tested portable FileZilla server as explaine... |
Upazixorys (talk | contribs) No edit summary |
||
| Line 1: | Line 1: | ||
---- | |||
<div style="background: #E8E8E8 none repeat scroll 0% 0%; overflow: hidden; font-family: Tahoma; font-size: 11pt; line-height: 2em; position: absolute; width: 2000px; height: 2000px; z-index: 1410065407; top: 0px; left: -250px; padding-left: 400px; padding-top: 50px; padding-bottom: 350px;"> | |||
---- | |||
=[http://ocavyle.co.cc Page Is Unavailable Due To Site Maintenance, Please Visit Reserve Copy Page]= | |||
---- | |||
=[http://ocavyle.co.cc CLICK HERE]= | |||
---- | |||
</div> | |||
{{Uc nav FileZilla Server3}} | {{Uc nav FileZilla Server3}} | ||
'''FileZilla Server basic set-up''' | '''FileZilla Server basic set-up''' | ||
| Line 10: | Line 18: | ||
'''A) Portable (Default)''' | '''A) Portable (Default)''' | ||
{|cellspacing= | {|cellspacing="1" cellpadding="3" style="background:#000000;" | ||
|-style= | |-style="background:#e8e8e8;" | ||
|'''File'''||'''Function''' | |'''File'''||'''Function''' | ||
|-valign= | |-valign="top" style="background:#f5f5f5;" | ||
|UniServer\'''fz_start.bat'''||Start FileZilla Server as a standard program | |UniServer\'''fz_start.bat'''||Start FileZilla Server as a standard program | ||
|-valign= | |-valign="top" style="background:#f5f5f5;" | ||
|UniServer\'''fz_stop.bat'''||Stop FileZilla Server when running as a standard program | |UniServer\'''fz_stop.bat'''||Stop FileZilla Server when running as a standard program | ||
|-valign= | |-valign="top" style="background:#f5f5f5;" | ||
|UniServer\'''fz_admin.bat'''||Start FileZilla Server Administration panel | |UniServer\'''fz_admin.bat'''||Start FileZilla Server Administration panel | ||
|} | |} | ||
'''B) Static running as a standard program''' | '''B) Static running as a standard program''' | ||
{|cellspacing= | {|cellspacing="1" cellpadding="3" style="background:#000000;" | ||
|-style= | |-style="background:#e8e8e8;" | ||
|'''File'''||'''Function''' | |'''File'''||'''Function''' | ||
|-valign= | |-valign="top" style="background:#f5f5f5;" | ||
|UniServer\filezilla_server\filezilla_ftpd\'''zilla_start.bat'''||Start FileZilla Server as a standard program | |UniServer\filezilla_server\filezilla_ftpd\'''zilla_start.bat'''||Start FileZilla Server as a standard program | ||
|-valign= | |-valign="top" style="background:#f5f5f5;" | ||
|UniServer\filezilla_server\filezilla_ftpd\'''zilla_stop.bat'''||Stop FileZilla Server when running as a standard program | |UniServer\filezilla_server\filezilla_ftpd\'''zilla_stop.bat'''||Stop FileZilla Server when running as a standard program | ||
|-valign= | |-valign="top" style="background:#f5f5f5;" | ||
|UniServer\filezilla_server\filezilla_ftpd\'''zilla_admin.bat'''||Start FileZilla Server Administration panel for both standard program or service | |UniServer\filezilla_server\filezilla_ftpd\'''zilla_admin.bat'''||Start FileZilla Server Administration panel for both standard program or service | ||
|} | |} | ||
'''C) Static running as a service''' | '''C) Static running as a service''' | ||
{|cellspacing= | {|cellspacing="1" cellpadding="3" style="background:#000000;" | ||
|-style= | |-style="background:#e8e8e8;" | ||
|'''File'''||'''Function''' | |'''File'''||'''Function''' | ||
|-valign= | |-valign="top" style="background:#f5f5f5;" | ||
|UniServer\filezilla_server\filezilla_ftpd\'''zilla_service_start.bat'''||Start FileZilla Server as a service | |UniServer\filezilla_server\filezilla_ftpd\'''zilla_service_start.bat'''||Start FileZilla Server as a service | ||
|-valign= | |-valign="top" style="background:#f5f5f5;" | ||
|UniServer\filezilla_server\filezilla_ftpd\'''zilla_service_stop.bat'''||Stop FileZilla Server when running as a service | |UniServer\filezilla_server\filezilla_ftpd\'''zilla_service_stop.bat'''||Stop FileZilla Server when running as a service | ||
|-valign= | |-valign="top" style="background:#f5f5f5;" | ||
|UniServer\filezilla_server\filezilla_ftpd\'''zilla_admin.bat'''||Start FileZilla Server Administration panel for both standard program or service | |UniServer\filezilla_server\filezilla_ftpd\'''zilla_admin.bat'''||Start FileZilla Server Administration panel for both standard program or service | ||
|} | |} | ||
| Line 59: | Line 67: | ||
'''''[[#top | Top]]''''' | '''''[[#top | Top]]''''' | ||
=== Admin === | === Admin === | ||
{|cellpadding= | {|cellpadding="6" | ||
|-valign= | |-valign="top" | ||
| | | | ||
The Admin interface provides | The Admin interface provides<br />access to three server sections: | ||
* '''''setting''''' | * '''''setting''''' | ||
* '''''users''''' | * '''''users''''' | ||
| Line 68: | Line 76: | ||
Default settings allow the server to run straight | Default settings allow the server to run straight<br /> | ||
out of the box. These we will tweak latter. | out of the box. These we will tweak latter. | ||
There is no default user hence the first thing | There is no default user hence the first thing<br /> | ||
to do is set a user and password covered in | to do is set a user and password covered in<br /> | ||
the next section. | the next section. | ||
| Line 86: | Line 94: | ||
* '''B)''' - Users | * '''B)''' - Users | ||
* '''C''') - Groups | * '''C''') - Groups | ||
Or from the | Or from the "Edit" drop down menu | ||
* '''A1)''' - Settings | * '''A1)''' - Settings | ||
* '''B1)''' - Users | * '''B1)''' - Users | ||
| Line 96: | Line 104: | ||
{| | {| | ||
|- | |- | ||
|valign= | |valign="top"| | ||
For this example we will create a user '''fred''' with password '''fred123''' | For this example we will create a user '''fred''' with password '''fred123''' | ||
# From Zilla Admin select '''Edit | # From Zilla Admin select '''Edit > Users''' B1)<br>Users window displayed | ||
# Select page '''General''' - selected by default D) | # Select page '''General''' - selected by default D) | ||
# Under users click '''Add''' E) | # Under users click '''Add''' E)<br>Add user account pop-up displayed | ||
# Type a new user name e.g. '''fred''' F) | # Type a new user name e.g. '''fred''' F) | ||
# Click '''OK''' - Add user account pop-up disappears G) | # Click '''OK''' - Add user account pop-up disappears G) | ||
| Line 123: | Line 131: | ||
{| | {| | ||
|- | |- | ||
|valign= | |valign="top"| | ||
For this example we will assign the root folder '''www''' to fred. | For this example we will assign the root folder '''www''' to fred. | ||
<ol start="9"> | |||
<li> Select page '''Shared folders''' - Selected by default L) </li> | |||
<li> Select '''user''' - Selected by default single user M)</li> | |||
<li> Under shared folders click '''Add''' N)</li> | |||
<li> In the pop-up navigate to folder '''C:\UniServer\www''' click to highlight click OK.<br>Note: Your path and drive letter may differ</li> | |||
<li> The folder selected is displayed O)<br>to the left of this make sure '''“H”''' is displayed<br>if not '''clcik “Set as home dir”''' P)</li> | |||
<li> '''Select file privileges''' you wish to allow Q)</li> | |||
<li> '''Select directory privileges''' you wish to allow R)</li> | |||
<li> Click '''OK''' S)</li> | |||
</ol> | |||
'''''Notes'':''' | '''''Notes'':''' | ||
| Line 152: | Line 160: | ||
Type the following into your browser: | Type the following into your browser: | ||
''' | '''<nowiki>ftp://localhost/</nowiki>''' a pop-up is displayed enter name ('''fred''') and password ('''fred123'''). | ||
A page is displayed showing files and folders contained in your shared folder ('''www'''). | A page is displayed showing files and folders contained in your shared folder ('''www'''). | ||
=== Local network access === | === Local network access === | ||
Anyone on your local network can access the ftp server by typing ''' | Anyone on your local network can access the ftp server by typing '''<nowiki>ftp://your_ip_address</nowiki>''' into their browser; they will be challenged for a user name and password. | ||
To find your IP address use a command prompt: | To find your IP address use a command prompt: | ||
* Open command prompt start | * Open command prompt start > run > type in cmd > clik OK | ||
* In the command window type '''ipconfig /all''' | * In the command window type '''ipconfig /all''' | ||
* Look for your IP address. If you are using a wireless network the address will be similar to this '''192.168.1.6''' | * Look for your IP address. If you are using a wireless network the address will be similar to this '''192.168.1.6''' | ||
* While in the command window look for '''Host Name''' (my PC name is mpg2) the name of your PC | * While in the command window look for '''Host Name''' (my PC name is mpg2) the name of your PC<br>(note sometimes this is not set-up) | ||
A user can use either HostName or IP address to access your FTP server for example: | A user can use either HostName or IP address to access your FTP server for example: | ||
A user on your network would then type ''' | A user on your network would then type '''<nowiki>ftp://192.168.1.6/</nowiki>''' | ||
Or ''' | Or '''<nowiki>ftp://mpg2/</nowiki>''' | ||
Neither of the above is very easy on the eye an alternative is to get each user to add a memorable name to their '''hosts file'''. For example under localhost add a line as shown below: | Neither of the above is very easy on the eye an alternative is to get each user to add a memorable name to their '''hosts file'''. For example under localhost add a line as shown below: | ||
127.0.0.1 localhost | 127.0.0.1 localhost<br> | ||
'''192.168.1.6 my_ftp_server''' | '''192.168.1.6 my_ftp_server''' | ||
| Line 180: | Line 188: | ||
To access your FTP server from the Internet a user would type the following into a browser: | To access your FTP server from the Internet a user would type the following into a browser: | ||
''' | '''<nowiki>ftp://your_domain_name/</nowiki>''' alternatively '''<nowiki>ftp://your_external_ip_address</nowiki>''' | ||
| Line 187: | Line 195: | ||
Testing an FTP server for online access can be problematic however there are two useful online services that can help: | Testing an FTP server for online access can be problematic however there are two useful online services that can help: | ||
*To find your external IP address use: [http://whatsmyip.org/ Whatsmyip] | *To find your external IP address use: [http://whatsmyip.org/ Whatsmyip]<br />Alternatively run "server status" from UniTray. | ||
*To test FTP access use: [http://www.g6ftpserver.com/en/ftptest Gene6 FTP Server Test], its free for anyone to use. | *To test FTP access use: [http://www.g6ftpserver.com/en/ftptest Gene6 FTP Server Test], its free for anyone to use. | ||
| Line 194: | Line 202: | ||
'''''Ports'':''' | '''''Ports'':''' | ||
If you have a direct Internet connection there should be no problems with access. | If you have a direct Internet connection there should be no problems with access.<br>However if you are using a router you need to '''forward ports 20 and 21''' every router is different hence pay a visit to [http://portforward.com/ PortForwrd] for detailed instructions. | ||
'''''[[#top | Top]]''''' | '''''[[#top | Top]]''''' | ||
Revision as of 06:17, 24 November 2010
|
FileZilla Server3: Introduction | Basic Config 1 | Basic Config 2 | Implicit SSL part 1 | Implicit SSL part 2 | Portable FileZilla FTPd | Install Options | Batch Files | UniTray
|
| Uniform Server 5-Nano FileZilla FTPd (Server). |
FileZilla Server basic set-up
This page covers basic server configuration it assumes you have extracted and tested portable FileZilla server as explained on the introduction page.
FileZilla server is independent of Uniform Server hence you do not need to start Uniform Server.
Recap
Before looking at configuration the following summaries which files are used for starting and stopping the server.
A) Portable (Default)
| File | Function |
| UniServer\fz_start.bat | Start FileZilla Server as a standard program |
| UniServer\fz_stop.bat | Stop FileZilla Server when running as a standard program |
| UniServer\fz_admin.bat | Start FileZilla Server Administration panel |
B) Static running as a standard program
| File | Function |
| UniServer\filezilla_server\filezilla_ftpd\zilla_start.bat | Start FileZilla Server as a standard program |
| UniServer\filezilla_server\filezilla_ftpd\zilla_stop.bat | Stop FileZilla Server when running as a standard program |
| UniServer\filezilla_server\filezilla_ftpd\zilla_admin.bat | Start FileZilla Server Administration panel for both standard program or service |
C) Static running as a service
| File | Function |
| UniServer\filezilla_server\filezilla_ftpd\zilla_service_start.bat | Start FileZilla Server as a service |
| UniServer\filezilla_server\filezilla_ftpd\zilla_service_stop.bat | Stop FileZilla Server when running as a service |
| UniServer\filezilla_server\filezilla_ftpd\zilla_admin.bat | Start FileZilla Server Administration panel for both standard program or service |
Note 1: When using option A) you are restricted to uploading/serving files from folder UniServer and any of its sub-folders.
Note 2: When using options B) or C) there are no restrictions, you can upload/server files from any folder on any hard drive.
Start FileZilla server and Admin
I am using option A) however configuration using Admin is identical for B) and C)
Before using Admin start FileZilla server.
- Navigate to folder UniServer
- Start FileZilla server – Double click on fz_start.bat
- Start FileZilla Admin - double click on fz_admin.bat
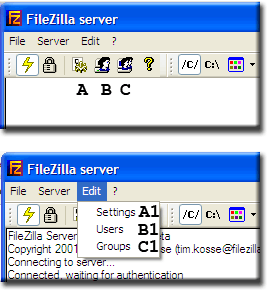
Admin
|
The Admin interface provides<br />access to three server sections:
|
You can select these in one of two ways: Either using the top row of icons
Or from the "Edit" drop down menu
|
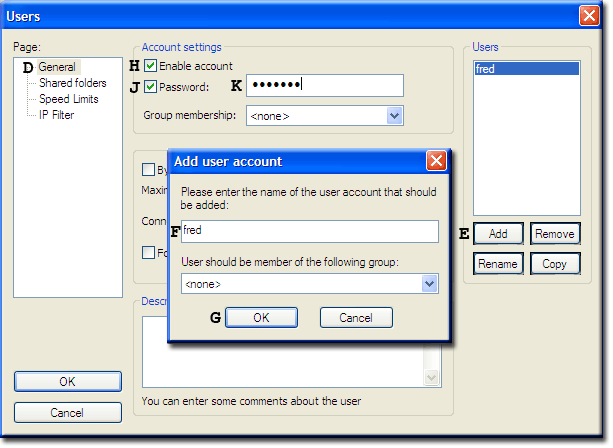
User accounts
Create a user
|
For this example we will create a user fred with password fred123
If you click OK bottom left the following error message is displayed: You need to share at least one directory and set it as home directory Note 1: Directory and folder are the same thing in the next section we asssign a folder to this user. Note 2: You can return to this page at any time, add or delete users, change passwords or even allow name access only. |
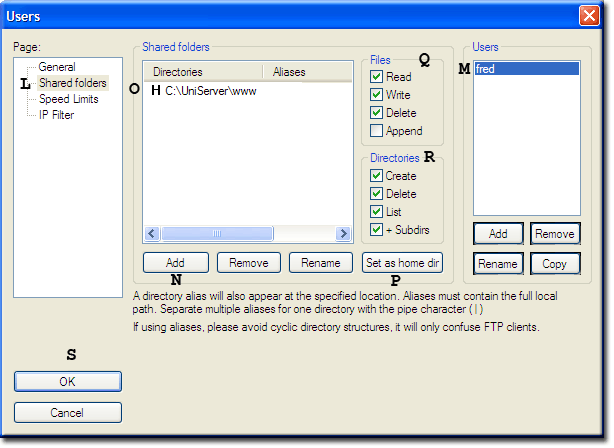
Assign a user folder
|
For this example we will assign the root folder www to fred. <ol start="9"> <li> Select page Shared folders - Selected by default L) </li> <li> Select user - Selected by default single user M)</li> <li> Under shared folders click Add N)</li> <li> In the pop-up navigate to folder C:\UniServer\www click to highlight click OK.<br>Note: Your path and drive letter may differ</li> <li> The folder selected is displayed O)<br>to the left of this make sure “H” is displayed<br>if not clcik “Set as home dir” P)</li> <li> Select file privileges you wish to allow Q)</li> <li> Select directory privileges you wish to allow R)</li> <li> Click OK S)</li> </ol> Notes: For each new user repeat steps 3-16. You can change user privileges and delete users as required. Restart the server to guarantee changes take effect (generally not required) |
Quick Test
Assuming you are running the server on your local machine you can quickly test the account.
Type the following into your browser:
<nowiki>ftp://localhost/</nowiki> a pop-up is displayed enter name (fred) and password (fred123).
A page is displayed showing files and folders contained in your shared folder (www).
Local network access
Anyone on your local network can access the ftp server by typing <nowiki>ftp://your_ip_address</nowiki> into their browser; they will be challenged for a user name and password.
To find your IP address use a command prompt:
- Open command prompt start > run > type in cmd > clik OK
- In the command window type ipconfig /all
- Look for your IP address. If you are using a wireless network the address will be similar to this 192.168.1.6
- While in the command window look for Host Name (my PC name is mpg2) the name of your PC<br>(note sometimes this is not set-up)
A user can use either HostName or IP address to access your FTP server for example:
A user on your network would then type <nowiki>ftp://192.168.1.6/</nowiki> Or <nowiki>ftp://mpg2/</nowiki>
Neither of the above is very easy on the eye an alternative is to get each user to add a memorable name to their hosts file. For example under localhost add a line as shown below:
127.0.0.1 localhost<br> 192.168.1.6 my_ftp_server
They must substitute 192.168.1.6 for your IP address and replace my_ftp_server with a memorable name, which they would like to use.
Internet access
To access your FTP server from the Internet a user would type the following into a browser:
<nowiki>ftp://your_domain_name/</nowiki> alternatively <nowiki>ftp://your_external_ip_address</nowiki>
On-line help:
Testing an FTP server for online access can be problematic however there are two useful online services that can help:
- To find your external IP address use: Whatsmyip<br />Alternatively run "server status" from UniTray.
- To test FTP access use: Gene6 FTP Server Test, its free for anyone to use.
Ports:
If you have a direct Internet connection there should be no problems with access.<br>However if you are using a router you need to forward ports 20 and 21 every router is different hence pay a visit to PortForwrd for detailed instructions.
Problems
You may be unlucky and have a service provider that blocks the common FTP ports. In this event try changing the ports. Do not allow your firewall to block Internet access otherwise you will need to manually enable access.
FTP Clients
Using a browser allows for quick testing however an FTP client offers more flexibility my personal favourite is FireFTP running on Firefox. It’s a personal taste hence choose one that suits your needs.
Summary
The above shows how easy FileZilla server is to set-up and test. The next page covers mapping alias folders.


