Old:Installing Xoops on 4.0-Mona: Difference between revisions
New page: <span id="top"></span> {| cellpadding="2" |__TOC__||'''Installing Xoops on 4.0-Mona''' |} '''Introduction''' This step-by-step guide shows how to install Xoops on Uniform Server V4.0-Mona... |
m BobS moved page Installing Xoops on 4.0-Mona to Old:Installing Xoops on 4.0-Mona without leaving a redirect |
||
| (One intermediate revision by the same user not shown) | |||
| Line 142: | Line 142: | ||
== Conclusion == | == Conclusion == | ||
You have seen how easy it is to install Xoops and make it fully portable. | |||
'''''Related links'':''' | '''''Related links'':''' | ||
| Line 148: | Line 148: | ||
[[Mini Servers: Ready To Go#Mini Server 21 - Xoops 2.3.1 | Mini Server 21 - Xoops 2.3.1]] | [[Mini Servers: Ready To Go#Mini Server 21 - Xoops 2.3.1 | Mini Server 21 - Xoops 2.3.1]] | ||
[[Installing Xoops | Installing Xoops US 3.5]] | [[Installing Xoops | Installing Xoops (US 3.5)]] | ||
| Line 156: | Line 156: | ||
[[Category: Uniform Server 4.0-Mona]] | [[Category: Uniform Server 4.0-Mona]] | ||
Latest revision as of 18:56, 22 June 2013
| Installing Xoops on 4.0-Mona |
Introduction
This step-by-step guide shows how to install Xoops on Uniform Server V4.0-Mona and resolve a portability issue.
Pre-Installation
|
Install Uniform server
Download Xoops
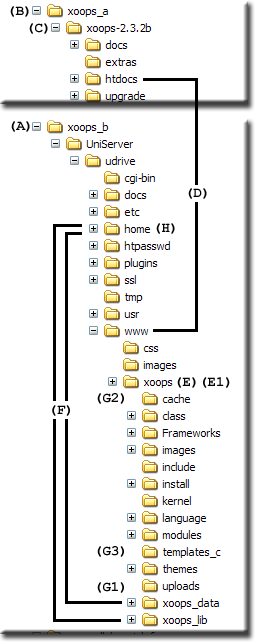
Copy files to Uniform Server
Still in folder xoops locate file mainfile.php and mainfile.dist.php check they are writeable if not remove read only atribute.
|
Install Xoops
- If not already running start Uniform Server. Xoops installation is mostly a click through exercise.
- Type the following into a browser: http://localhost/xoops/
- Choose your language: Click Next
- Welcome to the XOOPS installation assistant: Click Next
- Checking your server configuration: Click Next
- Paths settings: This will fail on xoops_data and xoops_lib these were moved for security.
- Change the path from: Z:/www/xoops/xoops_data to Z:\home\xoops_data
(Note when you click in the next text box the above path will be found) - Change path from: Z:/www/xoops/xoops_lib to Z:\home\xoops_lib
(Click in one of the other text boxes the path will be found) - Click Next
- Change the path from: Z:/www/xoops/xoops_data to Z:\home\xoops_data
- Database connection: Enter root for user name and root for password click Next
- Database configuration: For database name enter xoops click Next
- Saving your system configuration: Click Next
- Database tables creation: Click Next
- Please enter your initial settings:
Admin login: admin
Admin e-mail: fred@someone.com -- use a real e-mail address
Admin password: root66 -- use a real password
Click Next - Saving your settings to the database: Click Next
- Welcome to your XOOPS site:
"You can now access the home page of your site." -- don't click the link.
Click Next - Login as admin and click Administration Menu link
Note: These warnings:
WARNING: Directory Z:/www/xoops/install/ exists on your server.
Please remove this directory for security reasons.
WARNING: File Z:/www/xoops/mainfile.php is writeable by the server.
Please change the permission of this file for security reasons.
in Unix (444), in Win32 (read-only)
Make above changes and refresh the page warnings no longer displayed.
Note:
You can access your site by typing the following into a browser: http://localhost/xoops/index.php
Portability
A few paths (Z:) are hard coded to make it portable let PHP automatically determine the drive letter as follows:
Edit file UniServer\udrive\www\xoops\mainfile.php (you will need to remove read only attribute)
Locate this section of code:
    // XOOPS Physical Paths

    // Physical path to the XOOPS documents (served) directory WITHOUT trailing slash
    define( 'XOOPS_ROOT_PATH', 'Z:/www/xoops' );

    // For forward compatibility
    // Physical path to the XOOPS library directory WITHOUT trailing slash
    define( 'XOOPS_PATH', 'Z:/home/xoops_lib' );
    // Physical path to the XOOPS datafiles (writable) directory WITHOUT trailing slash
    define( 'XOOPS_VAR_PATH', 'Z:/home/xoops_data' );
    // Alias of XOOPS_PATH, for compatibility, temporary solution
    define("XOOPS_TRUST_PATH", XOOPS_PATH);
Replace with:
    // XOOPS Physical Paths
    $root= substr($_SERVER["DOCUMENT_ROOT"],0,-4);

    // Physical path to the XOOPS documents (served) directory WITHOUT trailing slash
    define( 'XOOPS_ROOT_PATH', $root.'/www/xoops' );

    // For forward compatibility
    // Physical path to the XOOPS library directory WITHOUT trailing slash
    define( 'XOOPS_PATH', $root.'/home/xoops_lib' );
    // Physical path to the XOOPS datafiles (writable) directory WITHOUT trailing slash
    define( 'XOOPS_VAR_PATH', $root.'/home/xoops_data' );
    // Alias of XOOPS_PATH, for compatibility, temporary solution
    define("XOOPS_TRUST_PATH", XOOPS_PATH);
$root= substr($_SERVER["DOCUMENT_ROOT"],0,-4); Effectively gives the drive (e.g. Z:) for virtual or disk-root installations. If installed as a service gives the path to the server root folder.
Note 1: After saving the file set it’s file attribute back to read only.
Note 2: Copy folder UniServer and all its content to a USB stick and you have fully portable Xoops server.
Conclusion
You have seen how easy it is to install Xoops and make it fully portable.
Related links:
