Coral: php pear
|
PHP - PEAR Auto Install The PHP Extension and Application Repository, or PEAR for short contains re-usable code. This page covers PEAR installation using go-pear, which is integrated into The Uniform Server’s architecture. |
| ||||||||||||||||||||||||||
Install PEAR core package
|
Open Pear control panel as follows: Server Configuration > PHP > Pear Control Panel
|
|
Note: Your Installation path may be different! |
Starting installation ...
Loading zlib: ok

Bootstrapping Installer...................
Bootstrapping PEAR.php............(remote) ok
Bootstrapping Archive/Tar.php............(remote) ok
Bootstrapping Console/Getopt.php............(remote) ok

Extracting installer..................
Downloading package: PEAR.............ok
Downloading package: Structures_Graph....ok

Preparing installer..................
Updating channel "doc.php.net"
Update of Channel "doc.php.net" succeeded
Updating channel "pear.php.net"
Update of Channel "pear.php.net" succeeded
Updating channel "pecl.php.net"
Update of Channel "pecl.php.net" succeeded

Installing selected packages..................
Downloading and installing package: PEAR.............ok
Installing bootstrap package: Structures_Graph.......ok
Downloading and installing package: Archive_Tar-stable.......ok
Downloading and installing package: Console_Getopt-stable.......ok
Downloading and installing package: PEAR_Frontend_Web-beta.......ok

Writing WebFrontend file ... ok

Installation Completed !
	Note: To use PEAR without any problems you need to add your
PEAR Installation path (C:\UniServer\home\us_pear\PEAR)
to your include_path.

Using a .htaccess file or directly edit httpd.conf would be working
solutions for Apache running servers, too.

Note: Above path already pre-configured in The Uniform Server hence
      you are ready to go.

For more information about PEAR, see:
PEAR FAQ
PEAR Manual

Thanks for using go-pear!

Start Web Frontend of the PEAR Installer >>
|
|
Open PEAR Web Frontend
After installing PEAR, you can access the web-front-end at any time using either of the following methods:
|
Method 1
|
|
Method 2
|
Using PEAR Frontend
Open the PEAR front-end using one of the methods explaind above.
Installing PEAR packages is very easy. To confirm our PEAR installation is working and to demonstrate how to install packages, we will be using a package named HTML_QuickForm
Update the Channel Management system
|
Before downloading any package, update the Channel Management system
You will receive something similar this: Updating channel "doc.php.net" Update of Channel "doc.php.net" succeeded Updating channel "pear.php.net" Channel "pear.php.net" is up to date Updating channel "pecl.php.net" Channel "pecl.php.net" is up to date |
Downloading modules
|
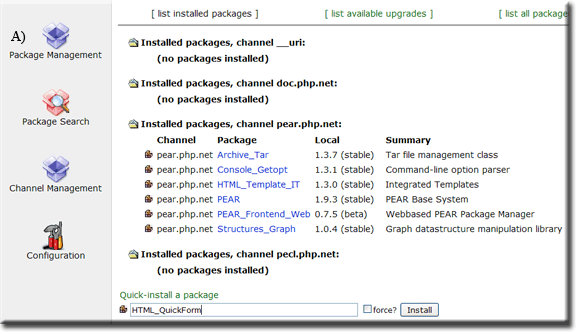
Downloading a known package (example HTML_QuickForm)
|
|
|
|
Although we intended to only download and install a single package, two were installed. The package HTML_QuickForm will not function without package HTML_Common; it depends on this being in place. In other words, when installing a package, all dependencies that do not exist are also installed. |
Form - Test Script
Create a new text file named form.php with the following content and save to folder UniServer\www
<!DOCTYPE HTML PUBLIC "-//W3C//DTD HTML 4.0 Transitional//EN">
  <html>
  <head>
      <meta http-equiv="Content-Type" content="text/html; charset=UTF-8">
      <title>Pear HTML_QuickForm test</title>
  </head>
  <body>
  <?php
      require_once "HTML/QuickForm.php";

      $form = new HTML_QuickForm('frmTest', 'get');
      $form->addElement('header', 'MyHeader', 'Testing QuickForm');
      $form->addElement('text', 'MyTextBox', 'What is your name?');
      $form->addElement('reset', 'btnClear', 'Clear');
      $form->addElement('submit', 'btnSubmit', 'Submit');
      $form->display();

  ?>
  </body>
  </html>
|
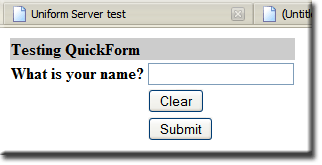
Test:
|
Where to next
PHP - PEAR Manual Install - This page covers manual PEAR installation.


